
DIY Floral Ice Balls: A Chic Party Twist
Welcome, fellow craft enthusiasts and party planners! Today, we're diving into the world of elegant party decor with a DIY project that's as simple as it is stunning – floral ice balls. Perfect for sprucing up your next gathering, these ice balls are a conversation starter and a beautiful addition to any occasion. And the best part? They're incredibly easy to make. So, let's get started!
Materials Needed:
Fresh roses in your choice of colors
Balloons (the clear kind will showcase your flowers best)
Scissors
Freezer space
A bowl or ice bucket for serving
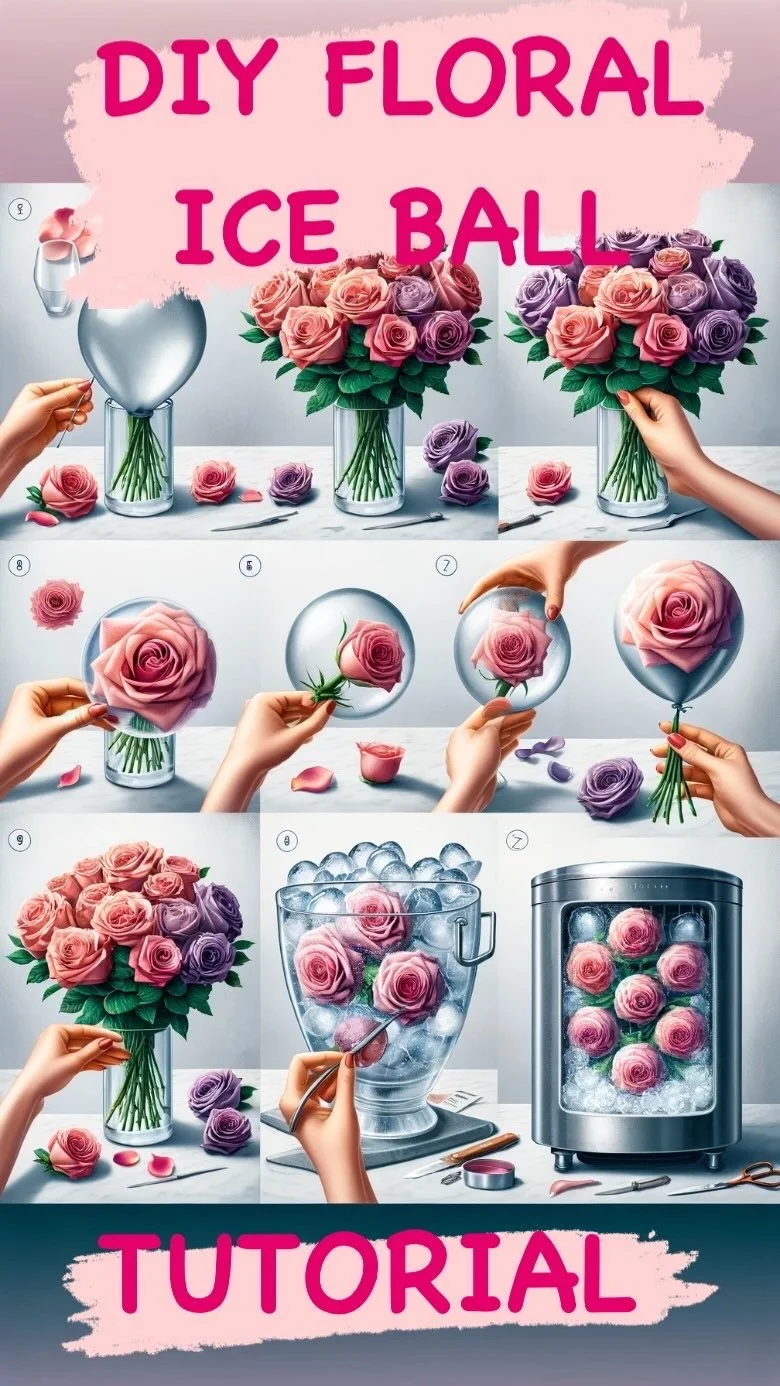
Instructions:
Step 1: Prep Your Petals Begin by selecting some fresh roses. The color and variety are entirely up to you; feel free to mix and match to complement your event's color scheme. Once you have your roses, it's time to trim. Cut the stems off, leaving just the flower heads. Make sure to remove any unwanted leaves or loose petals.
Step 2: Balloon Time Take a clear balloon and gently stretch the opening to make room for the rose head. This step might take a bit of finesse, but the balloon's natural elasticity will eventually give way. Once you've stretched it enough, carefully insert the rose head into the balloon.
Step 3: Water Works Now, hold the balloon under a faucet and fill it with water. Be mindful of the size – not too big that it won't fit in your freezer, but large enough to make an impact. As you fill the balloon, ensure that the rose head stays fully submerged in the water for a uniform freeze.
Step 4: Secure the Seal After your balloon is satisfactorily full, tie the end tightly. A good knot will prevent any water from escaping and ensure that your ice ball maintains its shape during the freezing process.
Step 5: Freeze Frame Place your water-filled balloons in the freezer. They'll need several hours – or, even better, overnight – to freeze completely. Patience is key here, so plan ahead.
Step 6: The Reveal Once your ice spheres are fully frozen, it's time for the big reveal. Snip the balloon with a pair of scissors or run the frozen balloon under warm water for a moment. The balloon should peel right off, leaving you with a gorgeous ice ball with a rose suspended inside.
Step 7: Display with Flair Grab your favorite bowl or ice bucket and arrange your floral ice balls inside. If there are any gaps, fill them with additional ice or clear water balls without flowers. The result? A luxurious, floral twist that's sure to elevate your party's aesthetic.
Conclusion: And there you have it – DIY floral ice balls that are as functional as they are beautiful. They not only keep drinks chilled but also add a touch of sophistication to your decor. Whether you're hosting a dinner party, bridal shower, or just want to add some flair to your weekend brunch, these ice balls are the perfect complement. So why not give it a try? Roll up your sleeves, and let's make your party one to remember!
DIY Floral Ice Balls: A Chic Party Twist
For those of you looking to add a chic twist to your parties with DIY Floral Ice Balls, I’ve curated a list of resources that will guide you through creating these beautiful and unique decorations. Each keyword is linked to a source filled with tips, tricks, and step-by-step instructions to ensure your event is a memorable one.
Creativity: Spark your creativity and learn the art of making floral ice balls with a detailed tutorial at Hometalk.
Visual Appeal: Enhance the visual appeal of your drinks and decor with floral ice ball ideas from this YouTube video.
Seasonal Touch: Add a seasonal touch to your gatherings with Christmas-themed floral ice balls, perfect for any festive occasion at Domestically Blissful.
Styling Tips: Discover three creative ways to style your floral ice cubes or balls for maximum impact at Claire Douglas Styling.
May these resources inspire you to create stunning floral ice balls that will be the talk of your next party. Enjoy your crafting! 🌸🧊


