
Knot Mastery Unleashed: Dive into 50+ Unique Ways to Tie
Welcome to the ultimate guide for knot enthusiasts and novices alike! Whether you're a seasoned sailor, an outdoor adventurer, or simply someone fascinated by the art of knot tying, you're in for a treat. In this comprehensive blog post, we'll explore over 50 unique and captivating knots, each accompanied by must-watch instructional videos that will take your knot mastery to new heights. From practical knots for everyday use to decorative knots that showcase true craftsmanship, prepare to be amazed as we delve into the world of knots like never before.
Why Knots Matter: Knots have been an integral part of human history for thousands of years, serving essential purposes in various aspects of life. From securing sails on ancient ships to tying down essential gear during outdoor expeditions, the versatility and utility of knots are unparalleled. Moreover, mastering the art of knot tying fosters a sense of self-reliance, problem-solving skills, and appreciation for traditional craftsmanship.
Exploring 50+ Unique Knots:
Must-Watch Instructional Videos: Embedded within this blog post are meticulously curated instructional videos for each of the featured knots. These videos provide step-by-step guidance, visual demonstrations, and insider tips to help you master each knot with ease. Whether you're a visual learner or prefer hands-on practice, these videos are an invaluable resource on your journey to knot mastery.
How to tie Knots Rope DIY Life Hacks at Home
Double Dragon Loop Knot - Better than a Bowline?
30+ Ropes and Knots Hacks For All Occasions
Slip Knot:

Here's an illustration of a tied slip knot, showcasing its structure and form. This image highlights the loop and the tail of the rope passing through it, demonstrating the simplicity and functionality of the slip knot.
Tying a slip knot is a fundamental skill that is useful in many situations, from securing loads to knitting and crochet. A slip knot is unique because it can be easily tightened or loosened by pulling on the rope, making it versatile for various applications. Here’s a simple tutorial on how to tie a slip knot:
Materials Needed
A length of rope or yarn, depending on your application.
Step-by-Step Instructions
Step 1: Make a Loop
Hold the rope in your hands. Take the end (we'll call this the "working end") and lay it over the rope, creating a loop. The working end should be on top of the standing part of the rope (the longer section not being used to form the loop).
Step 2: Create a Pretzel Shape
Take the working end and pass it under the standing part of the rope, then bring it back over the top to form a shape that resembles a pretzel or a “Q.”
Step 3: Pull the Loop Through
Reach through the loop you initially made and grab the part of the working end that you just brought over the standing part. Pull this bit through the loop, creating a new loop with the working end. This new loop is what will tighten or loosen when you adjust the slip knot.
Step 4: Adjust the Knot
Pull on the standing part of the rope to tighten the knot around the loop you've pulled through. You can adjust the size of the loop by pulling the working end to make it smaller or pulling on the loop itself to make it larger.
Step 5: Secure the Knot
Once you have the loop size you want, you can secure the slip knot by pulling on the standing part of the rope. The knot will tighten but can be easily loosened or undone by pulling on the working end.
Tips for Tying a Slip Knot
The slip knot should slide easily along the standing part of the rope when you pull on the loop or the working end. If it doesn't, you may need to adjust the tension or re-tie the knot.
Practice with different types of rope or yarn to get a feel for how the slip knot behaves with various materials. Some materials may slip easier than others.
When using a slip knot for activities like climbing or securing loads, always ensure the knot is tied securely and test it under a light load before relying on it.
Applications of a Slip Knot
Knitting and Crochet: Used to create the initial loop on the needle or hook.
Climbing and Camping: For quickly securing gear or adjusting tent lines.
Fishing: As a basic knot for attaching a hook or lure.
Boating: For temporarily securing boats to docks.
The slip knot's simplicity and adjustability make it a valuable knot to know for both practical tasks and hobbies. With a bit of practice, you can quickly master this knot and find many uses for it in your daily activities.
The Nice Knot EVERYONE Should Know
Prusik Knot:

Here's an illustration of a tied Prusik knot, showcasing its structure and form as it grips a climbing rope. This image emphasizes the looped cord wrapped around the climbing rope multiple times, demonstrating the knot's functionality and gripping ability in practical applications such as climbing and rescue operations.
Creating a Prusik knot is a valuable skill for climbers, rescuers, and anyone needing a friction hitch that can be easily adjusted yet holds firmly under tension. This knot is particularly useful because it can be tied around another rope, pole, or tree limb and will hold securely when loaded, but can slide when not under load. Here's a step-by-step guide on how to tie a Prusik knot:
Materials Needed
A piece of cord, typically 5 to 6 feet long. The diameter of the cord should be about half to two-thirds the diameter of the rope you're attaching it to for optimal grip.
A climbing rope or any rope around which the Prusik knot will be tied.
Step-by-Step Instructions
Step 1: Form a Loop
Begin by taking your piece of cord and tying its ends together with a double fisherman’s knot or another secure knot to form a loop.
Step 2: Wrap the Cord
Hold your looped cord and the rope (around which you are tying the Prusik knot) parallel to each other.
Pass the loop around the rope and then through itself. This is the beginning of the wrapping process.
Step 3: Continue Wrapping
Continue to pass the loop through itself, wrapping around the rope 2-4 times. The number of wraps depends on the weight it needs to support and the thickness of the ropes. More wraps increase friction and gripping strength but make the knot harder to slide when you want to adjust it.
Step 4: Tighten the Knot
After wrapping the cord around the rope the desired number of times, pull on both ends of the loop to tighten the wraps against each other. Make sure the coils are neat and lie flat against the rope without overlapping, as this maximizes the friction and effectiveness of the knot.
Step 5: Test the Knot
Before putting any weight on the knot, test it by pulling on the loop while holding the main rope steady. The knot should grip the rope and hold without sliding. If it slides easily, you may need to add more wraps or check that the wraps are neatly aligned and tightened.
Adjusting the Prusik Knot
To move the Prusik knot along the rope it’s attached to, simply loosen the tension by pushing the coils slightly apart, then slide the knot to its new position. Once in place, pull the loop tight to secure it.
Safety Tips
Always check the condition of both the cord and the rope before tying a Prusik knot. Avoid using worn or damaged materials.
Test the knot under a light load before using it in a critical situation to ensure it holds securely.
The Prusik knot is an essential tool in many outdoor activities and rescue operations due to its versatility and reliability. With practice, tying a Prusik knot will become a quick and easy task, offering a secure and adjustable solution whenever you need to create a strong grip on a rope.
7 Essential Knots You Need To Know
Alpine Butterfly Knot:

Here's an illustration of a tied Alpine Butterfly Knot, showcasing its structure and form. This image highlights the loop created by the knot and the way the rope twists and turns to form a secure, symmetrical structure, demonstrating the knot's strength and reliability for various practical applications.
The Alpine Butterfly Knot is a versatile and sturdy mid-line loop knot. It's particularly useful for climbers, hikers, and sailors because it can be tied in the middle of a rope without access to either end. This knot is excellent for creating a secure loop that can bear weight from any direction without slipping. Here’s how to tie the Alpine Butterfly Knot:
Materials Needed
A single piece of rope. The rope can be of any length, depending on your need to create a loop within it.
Step-by-Step Instructions
Step 1: Form a Loop
Lay the rope across your hand with the working end (the end you are using to tie the knot) facing towards your thumb.
Twist the rope on your hand twice to form two loops, creating a shape somewhat resembling an "8" lying on its side.
Step 2: Rearrange the Loops
Hold the arrangement in place. Pick up the first loop (the one closest to your palm) and lay it over the other two parts of the rope. This action crosses the middle segment of the rope over the other two, setting the structure for the butterfly shape.
Step 3: Create the Butterfly
With the first loop now lying on top, reach under the second loop (the middle one) and pull it through the first loop you just moved over. This step starts to form the "wings" of the butterfly.
Step 4: Tighten the Knot
Hold the newly formed loop (the one you just pulled through) and the standing part of the rope (the part not involved in the knot) in each hand. Pull them in opposite directions. As you pull, the knot will start to tighten and take shape.
Adjust the knot by pulling on the loops and the standing parts until the Alpine Butterfly Knot is compact and the loop is the size you desire.
Step 5: Inspect the Knot
Ensure that the knot is properly tied by checking for two parallel loops (the wings) and a loop sticking out at a perpendicular angle (the body of the butterfly). The knot should be neat and symmetrical.
Tips for Tying an Alpine Butterfly Knot
Practice tying the knot slowly to understand the structure of the loops and how they interlock.
Make sure the loops are arranged neatly before tightening the knot to avoid any unnecessary kinks or twists in the rope.
The Alpine Butterfly Knot can be loaded in three directions, making it exceptionally secure for attaching a carabiner, securing a load, or even isolating a damaged section of rope.
Applications of an Alpine Butterfly Knot
Climbing: To create secure attachment points along a rope for climbers or gear.
Sailing: For creating strong, fixed loops in the middle of lines for attaching hardware or other lines.
Rescue: To isolate a damaged section of rope or to create multiple attachment points along a single line for rescuers or equipment.
The Alpine Butterfly Knot is a reliable, strong, and easy-to-untie knot, even after bearing a heavy load. With a little practice, you can quickly master this knot, making it a handy addition to your knot-tying repertoire for various outdoor activities and critical applications.
A skill that EVERYONE should know!
Clove Hitch Knot:
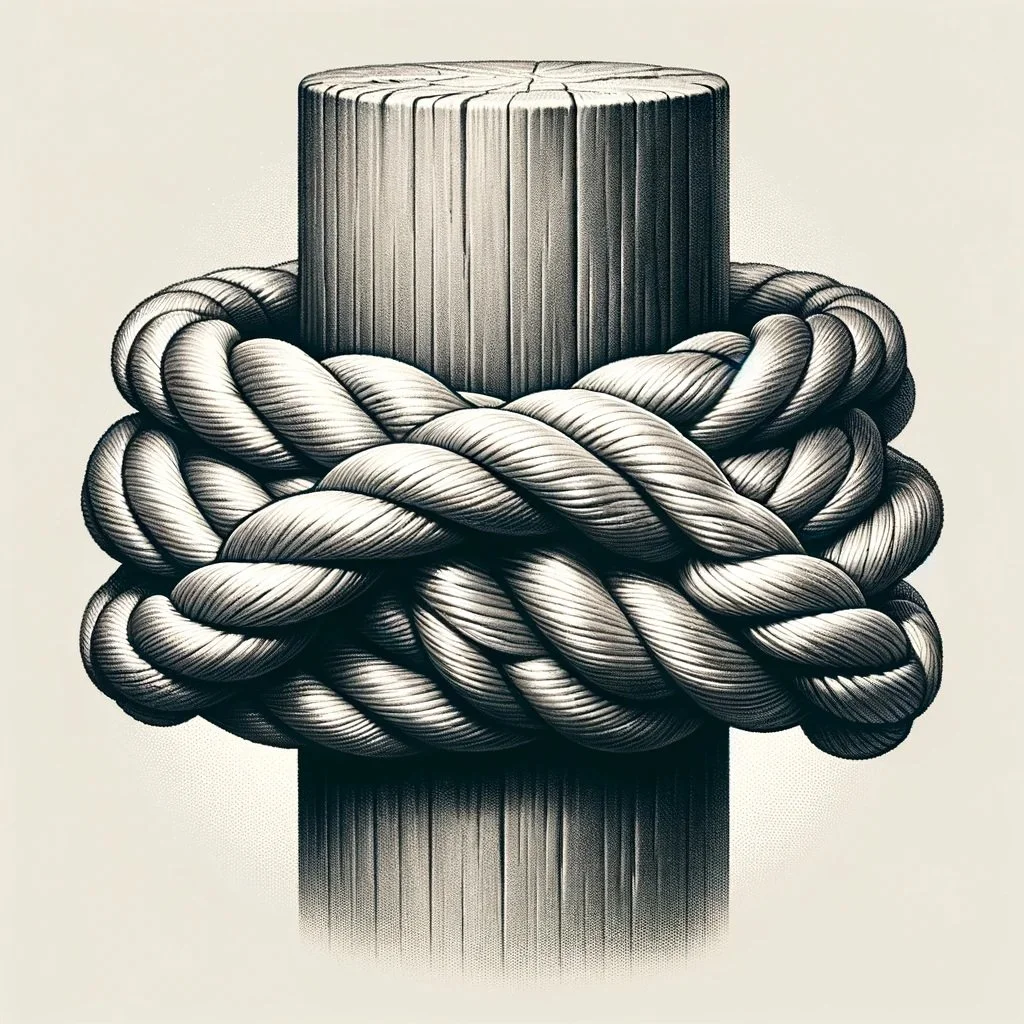
Here's an illustration of a tied Clove Hitch Knot, showcasing its structure and form as it wraps around a post or rail. This image highlights the simplicity and effectiveness of the Clove Hitch Knot in securing ropes to various objects, demonstrating its practical applications in scenarios such as mooring boats, securing loads, or in camping and climbing.
The Clove Hitch is a basic yet versatile knot that is widely used in climbing, sailing, and camping. It's particularly valued for its ease of tying and untying, especially when securing ropes to trees, poles, or other objects. This knot can be adjusted easily and is best used for situations where the load is not changing dramatically in direction. Here’s a simple guide on how to tie a Clove Hitch:
Materials Needed
A single piece of rope. The thickness and length will depend on the specific application.
Step-by-Step Instructions
Method 1: Tying Around an Object
Step 1: Start with a Loop
Hold the end of the rope (working end) and pass it around the object (pole, post, ring, etc.).
Cross over the standing part of the rope, creating a loop around the object.
Step 2: Create a Second Loop
Make a second loop by wrapping the rope around the object again, ensuring this loop is next to the first one, not on top of it.
Step 3: Pass the Working End Through
Lift the first loop slightly and pass the working end of the rope under it.
Pull the working end through until the knot tightens around the object.
Step 4: Tighten the Knot
Adjust both loops so they are snug against each other and tighten by pulling on both the standing part and the working end.
Method 2: Tying Without an Object
Step 1: Create a Cross
Lay the rope flat and cross the working end over the standing part to form an "X."
Step 2: Form the First Loop
Take the working end and form a loop by bringing it back under the standing part of the rope.
Step 3: Form the Second Loop
Create a second loop in the same manner as the first, ensuring it’s on top of the first loop.
Step 4: Combine the Loops
Hold both loops and place the second loop over the first.
Step 5: Slide Over an Object
Open the loops slightly and slide them over the object (pole, post, etc.). Tighten by pulling on both ends of the rope.
Tips for Tying a Clove Hitch
Ensure the two loops are snug against each other and the object for a secure hold.
The Clove Hitch can slip under heavy load or if the object it's tied to is very smooth. Consider using it in combination with other knots for added security.
It's an excellent knot for temporary holds or when you need to adjust the length of the rope frequently.
Applications of a Clove Hitch
Climbing: To quickly secure a rope to a carabiner or anchor point.
Sailing: For attaching fenders to a boat or securing a line to a post.
Camping: To tie off guy lines on tents or tarps.
The Clove Hitch is a fundamental knot with various practical applications. Its simplicity makes it one of the first knots that many people learn. While not the most secure knot under all circumstances, its ease of tying and untying makes it incredibly useful for temporary setups or situations where the load is not pulsing or changing direction rapidly.
8 Knots You Need to Know - How to tie knots you will actually use.
Double Fisherman's Knot:

Here's an illustration of a tied Double Fisherman's Knot, showcasing its structure and form. This image highlights how two ropes are intertwined with each other, with each end wrapping around the other rope multiple times before being threaded back through the created loops, demonstrating the knot's strength and reliability for joining two ropes together.
The Double Fisherman's Knot, also known as the Grapevine Knot, is a popular and strong method for joining two ends of a rope or two different ropes of similar diameter. It is widely used in climbing for making Prusik loops and joining ropes for rappels. The knot is known for its strength and the fact that it becomes more secure under tension, making it an excellent choice for critical applications. Here's a step-by-step guide on how to tie a Double Fisherman's Knot:
Materials Needed
Two lengths of rope, cord, or webbing. These can be the same or different colors, which might help in understanding the knot tying process.
Step-by-Step Instructions
Step 1: Align the Ends
Lay the two ends of the ropes parallel to each other, overlapping by at least a few inches (the more overlap, the easier to tie).
Step 2: Tie the First Knot
Take the end of rope A and wrap it around rope B twice, creating two coils lying next to each other.
After the second wrap, bring the end of rope A back towards itself and pass it through the two coils you just created.
Pull the end of rope A to tighten the coils around rope B, but do not fully tighten yet.
Step 3: Tie the Second Knot
Now, take the end of rope B and wrap it around rope A twice, mirroring the action you did with rope A.
After wrapping, pass the end of rope B through the two coils around rope A.
Pull the end of rope B to tighten the coils around rope A, similar to the first knot.
Step 4: Tighten the Knot
Pull both ends of ropes A and B in opposite directions to slide the two knots together. Adjust as necessary to ensure the knots are snug and tight against each other.
Once the knots are tightened and pushed together, you have a Double Fisherman's Knot.
Tips for Tying a Double Fisherman's Knot
Ensure the coils are neatly arranged before tightening; this will make the knot more secure and easier to untie later.
For added security, especially in critical applications, you can tie a Triple Fisherman's Knot by wrapping the ends three times instead of two before passing through the coils.
This knot can be difficult to untie after being loaded heavily. Applying a little water or saliva can help lubricate the knot for easier untying.
Applications of a Double Fisherman's Knot
Climbing: For creating Prusik loops or tying two ropes together for a rappel.
Camping and Hiking: For making adjustable loops in guy lines or joining two ropes securely.
Fishing: For tying leaders or lines together.
The Double Fisherman's Knot is a reliable method for creating a strong and secure connection between two ropes. While it may seem complex at first, with practice, it becomes an invaluable knot in your repertoire for various outdoor activities and critical applications.
The World’s Most Trusted Knot
Fisherman's Knot:

Here's an illustration of a tied Fisherman's Knot, showcasing its structure and form. This image highlights how two ropes are connected at their ends by the knot, with each end wrapped around the other rope and then passed back through the loop formed, demonstrating the knot's efficiency and reliability for joining two ropes together.
The Fisherman's Knot, also known as the Improved Clinch Knot in some circles, is a simple yet effective knot primarily used for attaching a fishing line to a hook, lure, or swivel. It's favored by anglers for its combination of ease to tie, strength, and reliability. Here's how you can tie a Fisherman's Knot:
Materials Needed
A fishing line.
A hook, lure, or swivel to attach the line to.
Step-by-Step Instructions
Step 1: Thread the Line
Begin by threading the end of the fishing line through the eye of the hook or swivel. Pull through enough line to work with, typically about 6 inches or more, depending on your comfort.
Step 2: Twist the Line
Hold the hook or swivel steady, and twist the free end of the line around the standing part of the line 5 to 7 times. The number of twists generally depends on the line's thickness; thinner lines may require more twists, while thicker lines may need fewer.
Step 3: Pass the Line Through the Loop
After twisting, you'll notice a small loop has formed near the eye of the hook. Pass the free end of the line through this loop.
Step 4: Final Loop and Tighten
Having passed the line through the loop near the eye, you will notice another loop has formed by doing so. Now, take the free end of the line and pass it through this second loop.
Step 5: Moisten and Tighten the Knot
Before fully tightening the knot, moisten it with a bit of water or saliva. This step reduces friction and allows the knot to tighten smoothly, ensuring maximum strength.
Pull on the free end while holding the hook or swivel to tighten the twists and secure the knot. Then, pull on the main line to slide the knot down towards the eye until it's snug.
Step 6: Trim the Excess
Use scissors or a knife to trim the excess line from the free end, leaving a small tag end. This step prevents the line from slipping and ensures the knot stays tight under tension.
Tips for Tying a Fisherman's Knot
Practice makes perfect. The more you tie this knot, the quicker and more reliable your knots will become.
Always moisten the knot before tightening to preserve the strength of the line.
For added security, especially with slippery synthetic lines, consider tying an Improved Clinch Knot by passing the free end through the loop created in Step 4 twice before tightening.
Applications of a Fisherman's Knot
Fishing: Attaching hooks, lures, or swivels to a fishing line.
Jewelry Making: Securing components in crafting and beadwork.
General Purpose: Anywhere a quick, secure attachment is needed.
The Fisherman's Knot is a foundational skill for anyone interested in fishing, offering a strong and reliable method for securing fishing tackle. With its straightforward steps and versatile applications, mastering this knot will enhance your fishing technique and overall outdoor preparedness.
The 10 Best Knots in Life (For VISUAL Learners)
Constrictor Knot:

Here's an illustration of a tied Constrictor Knot, showcasing its structure and form as it wraps around an object. This image highlights how the rope wraps around the object twice, with each wrap securing the previous one to create a tight and secure fastening, demonstrating the knot's simplicity and effectiveness in various practical applications.
The Constrictor Knot is a powerful binding knot known for its strong and secure hold. It's essentially a stronger version of the Clove Hitch and can be quite difficult to untie once tightened, especially if the knot has been under heavy load. This knot is ideal for situations where a very secure, temporary or semi-permanent binding is needed. Here's how to tie a Constrictor Knot:
Materials Needed
A length of rope or cord. The diameter can vary depending on the application, but the knot works well with a wide range of sizes.
Step-by-Step Instructions
Step 1: Make a Loop
Begin by making a simple overhand loop with your rope, ensuring that the working end (the end you're using to tie the knot) is on top.
Step 2: Form the Knot
Lay the working end of the rope over the standing part (the long, unused portion of the rope) to create a crossing point.
Bring the working end underneath and pass it through the loop you initially made, going over the first part of the loop, under the crossing point, and then over the second part of the loop. This step is similar to starting a Clove Hitch but with an additional twist.
Step 3: Tighten the Knot
Pull both the working end and the standing part of the rope to tighten the knot around the object. Ensure the coils are snug and the crossing part of the rope firmly secures them in place. The tighter you pull, the more secure the knot will be.
Alternative Method: Tying in the Hand
If you need to tie the Constrictor Knot in the middle of a rope or when you can't easily wrap the rope around the object, you can tie it in your hand and then slip it over the object.
Make a loop in the rope, then twist the loop once more so that you have a figure-eight shape. Hold the figure-eight such that one loop is above the other.
Place the object (or the part of the rope you want to bind) between the two loops of the figure-eight, then pull the ends to tighten the knot.
Tips for Tying a Constrictor Knot
The Constrictor Knot can be very difficult to untie, especially after it has been under load. Consider using it only in situations where you can cut the rope to release the knot or where a permanent solution is acceptable.
To make the knot even more secure or for use with slippery materials, tie a Double Constrictor Knot by making an additional twist before passing the working end through the loop.
Applications of a Constrictor Knot
Securing Packages: The Constrictor Knot is excellent for tying up parcels or bundles, as it tightens under load and doesn't easily come loose.
Temporary Repairs: Can be used to bind broken tool handles, splint broken tent poles, or any situation requiring a tight, secure hold.
Boating: Useful for securing boat lines in a pinch or when a highly secure, non-slipping knot is necessary.
The Constrictor Knot is an invaluable tool in your knot-tying arsenal, perfect for when you need a knot that holds tight and doesn’t slip. Remember, its strength is also its drawback since it can be very difficult to untie, so use it wisely.
The Scariest Knot Everyone Should Know
Monkey's Fist Knot:

Here's an illustration of a tied Monkey's Fist Knot, showcasing its intricate structure and spherical form. This image highlights the complexity of the knot with multiple coils wrapped tightly to form a compact, spherical shape, demonstrating the knot's traditional maritime use and its modern applications in crafting and decoration.
The Monkey's Fist knot is a traditional nautical knot that serves as a weight at the end of a rope, making it easier to throw. Originally used by sailors to pass lines between ships or from ship to shore, this decorative knot has also become popular as a keychain or ornamental addition to nautical-themed decor. Tying a Monkey's Fist can be a bit intricate, but with patience and practice, you can master this impressive knot.
Materials Needed
A length of rope or paracord, typically 3-5 feet long, depending on the desired size of the knot.
A small object to serve as the core (optional), such as a marble or a small ball, which will give the knot its shape and weight.
A flat surface to work on and possibly some tape to hold the rope in place as you start.
Step-by-Step Instructions
Step 1: Create the Vertical Loops
Start by holding the end of the rope in your left hand (this will be the working end). Leave a tail of about a foot or more; this will be used to finish the knot.
With the long part of the rope, make three loops around your fingers, keeping these loops fairly loose and of equal size. These are the vertical loops of your Monkey's Fist.
Step 2: Wrap the Horizontal Loops
Hold the structure you've just made, and start wrapping the rope around the three vertical loops you've created. Do this three times as well, but perpendicular to the first set of loops. These wraps should go around the outside of your initial loops.
After completing the three wraps, pull the working end through the center of the original loops to start the next step.
Step 3: Make the Final Set of Wraps
Next, you'll make another set of three loops, this time wrapping in the direction that's perpendicular to both the first and second sets of loops, effectively locking the knot structure in place. These final wraps will encase the first two sets of loops and should also pass through the center of the knot.
If you're using a core (like a marble), place it in the center of the knot before making these final wraps to ensure the knot forms around it.
Step 4: Tighten the Knot
Begin tightening the knot by gently pulling on each loop in the order you made them, starting with the first set of vertical loops, then the horizontal, and finally the last set. This step requires patience and attention to detail to ensure the knot tightens evenly.
Continue working around the knot, tightening each loop gradually. The goal is to make all loops tight and even, with the core securely encased in the middle.
Step 5: Finishing the Knot
Once the knot is fully tightened and the loops are evenly distributed, you can finish the knot by tucking the working end through the loops to secure it. Depending on your intended use, you may also want to seal the end with a lighter (if using synthetic rope) or tuck it in a way that it can be hidden.
Tips for Tying a Monkey's Fist Knot
Practice with a larger rope and a bigger core object initially, as this will make the structure of the knot easier to understand.
Use a needle or a small stick to help loosen or tighten specific parts of the knot as you work.
Patience is key. Your first few attempts might not be perfect, but with practice, you'll improve.
Applications of a Monkey's Fist Knot
Weighted End for Throwing Ropes: Useful for throwing lines over distances.
Decorative Purposes: As keychains, curtain tiebacks, or part of nautical-themed decorations.
Self-Defense Tool: When tied with a heavy core and attached to a keychain or lanyard.
The Monkey's Fist is not only a functional knot but also an attractive piece of nautical artistry. Whether you're using it for practical purposes or as a decorative item, mastering this knot can be a rewarding challenge.
8 Awesome Paracord Zipper Pulls
Bowline Knot:

Here's an illustration of a tied Bowline Knot, showcasing its structure and form. This image highlights the loop created by the knot and how the rope's working end passes through the loop, wraps around the standing part, and then back down through the loop, demonstrating the knot's strength and reliability for various applications such as sailing, securing loads, or in rescue operations.
The Bowline Knot is one of the most useful knots due to its versatility and the fact that it is easy to tie and untie, even after being subjected to a heavy load. This knot forms a secure loop at the end of a rope, which will not slip or bind and can be used in a variety of situations, such as sailing, camping, and rescue operations. Here's how to tie a Bowline Knot:
Materials Needed
A single piece of rope. The thickness and length of the rope can vary depending on the intended use.
Step-by-Step Instructions
Step 1: Create a Small Loop
Hold the rope in your hands, and then make a small loop near the end of the rope. This loop is often referred to as the "rabbit hole." Make sure that the loop is made in such a way that the working end (the end of the rope you're using to tie the knot) is on top of the standing part (the longer section of the rope).
Step 2: Bring the Working End Up
Imagine a rabbit coming out of the hole. Pass the working end of the rope up through the loop you just made from underneath. This will be the "rabbit" coming out of the "hole."
Step 3: Wrap Around the Tree
Now, take the working end (the rabbit) and pass it behind the standing part of the rope (the tree).
Step 4: Go Back Down the Hole
After wrapping the working end around the standing part, bring it back down through the loop (the rabbit hole) from the top.
Step 5: Tighten the Knot
Hold the standing part of the rope with one hand and the loop with your other hand. Pull the working end while holding the standing part to tighten the knot. As you pull, the loop formed by the Bowline Knot will become secure. Adjust the size of the loop to your need before tightening fully.
Step 6: Final Adjustment
Pull on the loop and the standing part simultaneously to fully secure the knot. The Bowline Knot should have a triangular shape, with the loop at one corner and the knot itself snug against the standing part.
Tips for Tying a Bowline Knot
Practice tying the Bowline Knot until you can do it quickly and efficiently. Speed can be crucial in emergency situations.
The story of the rabbit coming out of the hole, going around the tree, and back down the hole is a helpful way to remember the steps for tying this knot.
Make sure the knot is tightly secured before relying on it, especially in critical applications like climbing or rescue.
Applications of a Bowline Knot
Sailing: For forming a non-slip loop at the end of a line for attaching sails, anchors, or other equipment.
Camping and Hiking: For setting up tarps, securing tents, or creating a rescue line.
Rescue Operations: As a safe and secure loop to assist in rescues, especially in water rescue situations.
The Bowline Knot's simplicity, strength, and reliability make it a must-know for anyone who spends time outdoors or on the water. With a bit of practice, you'll find this knot invaluable in a variety of settings.
Super Strength Tow Rope Knot
Water Knot:
Here's an illustration of a tied Water Knot, showcasing its structure and form. This image highlights how two ends of webbing are interlaced to form a secure, flat knot, demonstrating its efficiency and reliability for joining two pieces of webbing together in climbing applications, such as creating loops or extending anchor points in climbing gear.
The Water Knot, also known as the Tape Knot, is a highly effective knot used primarily to join two pieces of webbing or flat material together. It's a staple in climbing, particularly for creating or repairing slings, and in situations where flat straps need to be connected securely. The Water Knot is revered for its simplicity and strength when tied correctly. Here's how to tie a Water Knot:
Materials Needed
Two lengths of webbing or flat material. The webbing could be nylon or polyester, commonly used in climbing and rescue operations.
Step-by-Step Instructions
Step 1: Tie an Overhand Knot
Start with one end of the webbing. Tie a simple overhand knot by making a loop and then passing the end of the webbing through the loop. Pull the knot tight, leaving enough tail (at least 6 inches) to ensure the knot can be properly tied and will not slip through when tightened.
Step 2: Thread the Second Piece
Take the second piece of webbing and start threading it in reverse through the overhand knot you just created with the first piece of webbing. Begin by finding the end of the second piece of webbing and following the path of the overhand knot backward.
Carefully follow the exact path of the first overhand knot, ensuring the second piece of webbing lies flat against the first without any twists or overlaps. This step is crucial for the strength and stability of the knot.
Step 3: Tighten the Knot
Once you have threaded the second piece of webbing through the overhand knot, pull both ends of each piece of webbing to tighten the knot. Make sure the knot is compact and the tails are long enough (again, at least 6 inches) to prevent the knot from untying under load.
It’s important to tighten the knot by pulling on all four ends (both tails and both standing parts) to evenly distribute the tension.
Step 4: Inspect the Knot
After tightening, inspect the Water Knot to ensure it is properly tied. The webbing should run parallel to itself with no twists, and the tails should protrude from the knot without any signs of slippage.
A properly tied Water Knot will have the tails exiting the knot in opposite directions, lying flat against the loops of the knot.
Tips for Tying a Water Knot
Always leave long tails (at least 6 inches) when tying a Water Knot to allow for any slippage that might occur under load. This is especially important for safety in climbing applications.
Regularly inspect your knots, especially before use in critical situations. The Water Knot can slip slightly when first loaded, so it's important to check that the tails are still long enough after loading.
If the webbing is wet, dirty, or icy, take extra care to ensure the knot is tightly secured, as these conditions can affect the knot’s security.
Applications of a Water Knot
Climbing: For joining two slings together or making a loop out of a single piece of webbing.
Rescue Operations: For creating anchors or extending reach with webbing.
Camping and Hiking: For repairing gear or creating custom straps.
The Water Knot's reliability and ease of inspection make it a favorite among climbers and outdoor enthusiasts. With practice, tying a Water Knot becomes a quick and straightforward process, providing a secure means of joining webbing for a variety of applications.
How to Tie the Most Useful Knot in The World (Bowline)
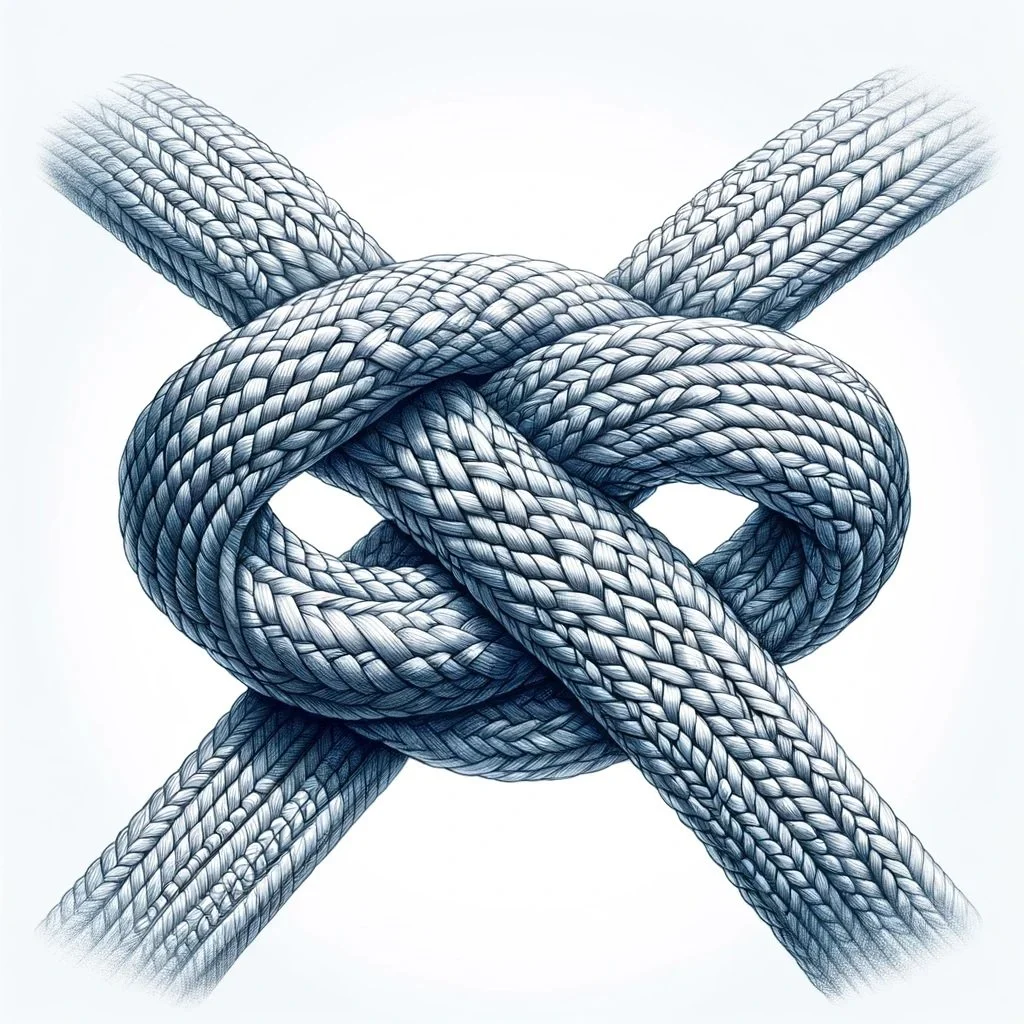
Zeppelin Bend:

Here's an illustration of a tied Zeppelin Bend Knot, showcasing its structure and form. This image highlights how two ends of a rope are intricately intertwined to form a secure, symmetrical, and reliable connection, demonstrating the knot's stability, ease of untying, and efficiency in load distribution, making it highly valued in activities such as climbing, sailing, and rescue operations.
The Zeppelin Bend is a secure, jam-resistant knot used to join two ends of rope together. It's known for its reliability and ease of untying, even after being subjected to heavy loads. This makes it an excellent choice for critical applications such as climbing, sailing, and rescue operations. Here's a step-by-step guide on how to tie the Zeppelin Bend:
Materials Needed
Two lengths of rope. These can be of the same or different diameters, but the knot is most easily tied and most secure when the ropes are of similar thickness.
Step-by-Step Instructions
Step 1: Form Two Bights
Take the end of each rope and form a bight (a simple loop that does not cross over itself) in each one. Make sure the bights are oriented in opposite directions; for example, if the bight in the first rope is curving towards you, the bight in the second rope should curve away from you.
Step 2: Lay the Bights Over Each Other
Place the bights so that they lay over each other, with the working end (the end of the rope used to tie the knot) of each rope on opposite sides. The ropes should look like two mirrored 'S' shapes lying on top of each other.
Step 3: Pass the Ends Through
Take the working end of the first rope and pass it under the standing part (the longer section of rope not involved in the bight) of the second rope, then through the bight of the second rope, going from the outside towards the center.
Repeat this step with the working end of the second rope, passing it under the standing part of the first rope and then through the bight of the first rope, also from the outside towards the center.
Step 4: Adjust and Tighten
Before tightening, ensure that the working ends are coming out from the center of the bights and not from the sides. This is crucial for the knot's strength and stability.
Carefully begin to pull both ends and the standing parts of the ropes to tighten the knot. Adjust as needed to ensure the knot forms correctly.
The Zeppelin Bend should have a symmetrical, interlocking appearance when correctly tied, with the ropes equally sharing the load.
Tips for Tying a Zeppelin Bend
Make sure the initial bights are oriented correctly relative to each other, as this is key to forming the knot properly.
Tighten the knot gradually, ensuring that the strands do not cross over each other incorrectly. The final form should be neat and symmetrical.
The Zeppelin Bend is known for its security, but always test knots under controlled conditions before relying on them in a critical situation.
Applications of a Zeppelin Bend
Climbing: For joining ropes together for rappels or anchors.
Sailing: For attaching lines securely, especially where ease of untying is necessary.
Camping and Backpacking: For tying guy lines or bear bags where security and ease of untying are important.
The Zeppelin Bend's combination of security, resistance to jamming, and ease of untying make it a superior choice for many applications. With practice, it can be tied quickly and will serve well in many outdoor and safety-critical scenarios.
Most useful knots skill
Figure Eight Knot:

Here's an illustration of a tied Figure Eight Knot, showcasing its structure and form. This image highlights the rope bending into itself to form an 8-shaped pattern, demonstrating the knot's strength and reliability in preventing the rope from slipping through equipment, making it essential in climbing, sailing, and safety applications.
The Figure Eight Knot is a fundamental knot that is both easy to tie and highly secure. It's commonly used in climbing as a stopper knot to prevent ropes from running out of retaining devices, but its applications extend to sailing, caving, and general purpose use wherever a strong, non-slipping loop is needed. The knot forms the basis of several other important knots used in various outdoor activities. Here's how to tie a Figure Eight Knot:
Materials Needed
A single piece of rope. The diameter and length of the rope can vary depending on the intended use.
Step-by-Step Instructions
Step 1: Make a Loop
Hold the rope in front of you and create a loop by crossing the working end (the end you're holding) over the standing part (the longer section of the rope).
Step 2: Twist the Loop
Twist the loop by bringing the working end underneath the standing part. This action adds another twist to the loop, making it resemble the figure eight.
Step 3: Bring the End Through
Pass the working end up through the bottom of the loop you've just created. This step finalizes the figure eight shape of the knot.
Step 4: Tighten the Knot
Pull on the working end while holding the standing part of the rope to tighten the knot. Adjust the knot by pulling on the loops and straightening the strands to ensure the knot is neat and secure.
Tips for Tying a Figure Eight Knot
Ensure the knot is dressed properly, meaning that the rope strands run parallel to each other without any crossings or overlaps that could weaken the knot.
The Figure Eight Knot can be used as a stopper knot or as the foundation for more complex knots, such as the Figure Eight Follow Through (used for tying into a climbing harness) or the Figure Eight Bend (for joining two ropes together).
Practicing the knot with a thicker rope or cord can help you understand its structure better before using it in critical applications.
Applications of a Figure Eight Knot
Climbing: As a stopper knot or as part of a system for securing a climber to a harness.
Sailing: To prevent ropes from running through pulleys or out of grips.
General Use: Anywhere a strong, non-slipping loop is needed for attachment or securing loads.
The Figure Eight Knot is admired for its strength, simplicity, and the ease with which it can be inspected. Once tied, a quick glance confirms its correctness. It’s a versatile knot that forms the basis of many other knots and systems in climbing, sailing, and beyond.
Bank robbers knot, Highwaymans hitch, Getaway knot
Turk's Head Knot:

Here's the illustration of a tied Turk's head knot, showcasing its intricate design and complexity.
The Turk's Head Knot is a decorative knot often used to wrap the handles of tools or walking sticks, serving both to provide a better grip and as an aesthetic enhancement. It's also popular among sailors for decorating wheel spokes or as a way to mark the "king spoke" of a ship's wheel. This knot can be quite complex, depending on the number of leads and bights used, but we'll cover a basic version to get you started.
Materials Needed
A length of cord or rope. The thickness can vary based on the object you're wrapping, but a thinner cord is generally easier to work with for your first few attempts.
A cylindrical object to practice on, such as a dowel, handle, or even your hand (for practicing purposes).
Step-by-Step Instructions for a Basic Turk's Head Knot
Step 1: Start the Loop
Hold the cord in your left hand and lay it over the object you're wrapping, leaving a long tail hanging off to the right (this will be the working end). The loop in your left hand is the start of the knot.
Step 2: Weave the Knot
Cross the working end over the standing end (the part of the cord leading off to the left) to make a basic loop around the object.
Lead the working end under the standing part as it comes around the other side of the object, forming a second loop next to the first.
Continue this process, weaving the working end over and under the existing wraps. You'll start to see a woven pattern emerge. For a basic Turk's Head, aim for three consecutive leads (wraps that run parallel along the length of the object).
Step 3: Follow the Lead
Once you have the initial weave, continue wrapping the working end around the object, following the path of the weave you've just created. Essentially, you're doubling up the rope along the path already laid out, sliding it next to or beneath the existing wraps to add depth to the knot.
Step 4: Tighten and Adjust
As you complete the second pass of the weave, start tightening the knot by gently pulling on the loops to remove slack. Work your way around the knot several times to evenly tighten, being careful not to distort the woven pattern.
Adjust the positioning of the wraps as needed to ensure an even, symmetrical appearance. The goal is to have all parts of the rope snug against the object, with no overlaps or gaps.
Tips for Tying a Turk's Head Knot
Practice with a flexible, easily handled cord or rope to begin with. Paracord is a great choice for beginners.
Tension is key. Keep the wraps snug but not so tight that you can't adjust them as needed.
The beauty of the Turk's Head Knot lies in its symmetry and evenness. Take your time to adjust the wraps for a polished look.
Applications of a Turk's Head Knot
Decorative: Adding grip and aesthetic appeal to walking sticks, tool handles, or the spokes of a ship's wheel.
Jewelry: Creating bracelets, necklaces, or other wearable items.
Identification: Marking items for easy identification or personalization.
Tying a Turk's Head Knot can be a meditative and rewarding process, leading to beautiful results that are both functional and decorative. With practice, you can experiment with more complex versions, varying the number of leads and bights to create intricate patterns and designs.
You’re Tying Your Pants Wrong
Double Overhand Knot:

Here's the illustration of a tied double overhand knot, highlighting its simple yet effective design.
The Double Overhand Knot is a simple yet effective knot, serving as a more secure version of the basic overhand knot. It is often used as a stopper knot to prevent a rope from slipping through a hole or as an end knot to keep the rope from fraying. It's also the foundation for tying more complex knots in climbing, fishing, and jewelry making. Here’s a step-by-step guide on how to tie a Double Overhand Knot:
Materials Needed
A piece of rope or cord. The diameter can vary depending on your specific needs.
Step-by-Step Instructions
Step 1: Make an Overhand Loop
Hold the rope in your hands and create a loop by crossing the working end (the end of the rope you're holding) over the standing part (the long, continuous part of the rope).
Step 2: Twist the Loop Again
Twist the working end around the standing part once more, passing it under the standing part again to create a second loop. This action adds an extra twist compared to the single overhand knot, increasing the knot's security.
Step 3: Pass the Working End Through the Loops
Take the working end of the rope and pass it through the loops you've just created. Ensure you're passing it through both loops, not just one, to properly form the double overhand knot.
Step 4: Tighten the Knot
Hold the standing part of the rope with one hand and pull the working end with your other hand to tighten the knot. As you pull, the loops should snug up against each other, forming the double overhand knot.
Adjust the knot by pulling on the loops and working end until it's compact and secure.
Tips for Tying a Double Overhand Knot
The Double Overhand Knot can be quite secure and may be difficult to untie, especially if it has been under load or if the rope is stiff. Consider this when deciding where to use it.
For even more security, you can tie a Triple Overhand Knot by adding another loop before passing the working end through the loops.
This knot works well with both flexible and stiff ropes, making it versatile for various applications.
Applications of a Double Overhand Knot
Climbing: As a stopper knot to prevent ropes from running through gear.
Fishing: To create secure loops or as part of more complex fishing knots.
Jewelry Making: To secure the ends of bracelets or necklaces made from thin cord or leather.
The Double Overhand Knot is a basic skill in knot tying that serves as a building block for many other knots. Its simplicity, combined with its strength, makes it a valuable knot to master for both practical and recreational uses.
Rope connection knot, knotting method
Falconer's Knot:

Here's the illustration of a tied falconer's knot, showcasing its specialized use and functional beauty, tied around a glove as is typical in falconry.
The Falconer's Knot is a specialized knot used primarily in the sport of falconry, designed for the secure tethering of a bird of prey to a perch with a quick-release mechanism. It's essential for falconers because it ensures the safety of the bird, allowing it to be secured or released quickly. The knot is tied in such a way that it can be undone with a single pull, even while wearing gloves. Here’s how to tie a Falconer's Knot:
Materials Needed
A falconry jess, which is a short strap typically made from leather, attached to the bird’s legs.
A leash, made from a strong, flexible material like leather or braided Dacron, which connects the jess to the perch or glove.
A perch or a falconer’s glove.
Step-by-Step Instructions
Step 1: Prepare the Leash
Hold the leash in your hand, ensuring that the bird is comfortably perched. The leash should extend from the bird’s jess to your hand.
Step 2: Create a Loop
With the hand holding the leash (usually the left hand for right-handed falconers), create a loop by folding the leash back towards your palm. The end of the leash (attached to the jess) should be pointing towards your elbow.
Step 3: Secure the Loop
Wrap the leash around the perch (or through the swivel on your glove) and bring it back towards the loop you're holding. The idea is to have the leash go around the anchoring point and then back towards your hand.
Step 4: Tie the Knot
Pass the end of the leash (coming from the anchoring point) through the loop you’re holding in your hand.
Wrap the end of the leash around the standing part of the leash (the section between the loop and the anchoring point) and then back through the loop again. This action creates a slip knot around the standing part of the leash.
Step 5: Tighten and Secure
Hold the end of the leash and the loop with one hand, and pull the standing part of the leash with your other hand to tighten the knot against the anchoring point. The knot should be snug but not overly tight, ensuring the bird’s safety without causing discomfort.
To secure the knot, tuck the end of the leash into the loop so that it doesn’t come undone accidentally.
Step 6: Quick Release
To release the knot, simply pull on the end of the leash that was tucked into the loop. The knot should come undone easily, allowing for quick release of the bird.
Tips for Tying a Falconer's Knot
Practice tying the Falconer's Knot with gloves on, as this is how you'll likely be using it in real falconry situations.
Make sure the knot is tight enough to secure the bird but not so tight as to cause harm or discomfort.
Regularly inspect the jess and leash for wear and tear to ensure the safety of the bird.
Applications of a Falconer's Knot
Primarily used in falconry for securing birds of prey to a falconer’s glove or a perch.
The Falconer's Knot is an essential skill for falconers, providing a secure yet quickly releasable tether for birds of prey. Mastering this knot ensures the safety and well-being of the bird while allowing for the rapid deployment or recall of the bird as required.
It’s not a knot…It’s Better
Lanyard Knot:

Here's the illustration of a tied lanyard knot, highlighting its aesthetic appeal and practical functionality with a symmetrical, diamond-shaped design.
The Lanyard Knot, also known as the Diamond Knot, is a decorative knot that forms a fixed loop at the end of a rope or cord. It's commonly used in making lanyards, keychains, and as a stopper or decorative element in bracelets and other paracord projects. The knot is not only functional but also adds an attractive finish to your work. Here’s a step-by-step guide on how to tie a Lanyard Knot:
Materials Needed
A length of rope, paracord, or any flexible cord suitable for your project. For learning purposes, a longer piece of cord is easier to work with.
Step-by-Step Instructions
Step 1: Create Two Loops
Take your cord and fold it in half to find the center.
Form a loop by crossing the right strand over the left strand, then make a second loop by crossing the left strand over the right, ensuring this second loop is directly below the first. You should now have two loops resembling a figure-eight.
Step 2: Weave the Right End
Take the right end of the cord and pass it upwards through the right loop of the figure-eight from underneath.
Step 3: Weave the Left End
Take the left end of the cord and pass it downwards through the left loop of the figure-eight, but this time do it over the top.
Step 4: Tighten the Knot
You should now have a loose version of the Lanyard Knot with four strands coming out from the center. Carefully begin to pull each of the strands, one at a time, to start tightening the knot.
Gradually adjust the tension by pulling on each strand equally until the knot is firm and evenly shaped. The goal is to form a tight, symmetrical diamond shape in the center.
Tips for Tying a Lanyard Knot
Maintain even tension on all four strands as you tighten the knot to ensure symmetry.
Practice with a longer piece of cord until you become familiar with the weaving pattern. Once you're comfortable, you can use shorter lengths for actual projects.
The Lanyard Knot can be bulky, making it an excellent choice for decorative purposes or as a stopper knot.
Applications of a Lanyard Knot
Lanyards: For attaching keys, whistles, knives, or other tools for easy access.
Bracelets and Keychains: Adds a decorative element and functional loop to paracord bracelets and keychains.
Decorative Projects: Used in crafting and decorative tying to add visual interest to various items.
The Lanyard Knot is a versatile and attractive knot that can enhance the functionality and appearance of your projects. With practice, you can easily incorporate this knot into your knot-tying repertoire, adding a professional touch to handmade items.
The Trucker’s Hitch…But Better.
Chain Sinnet Knot:
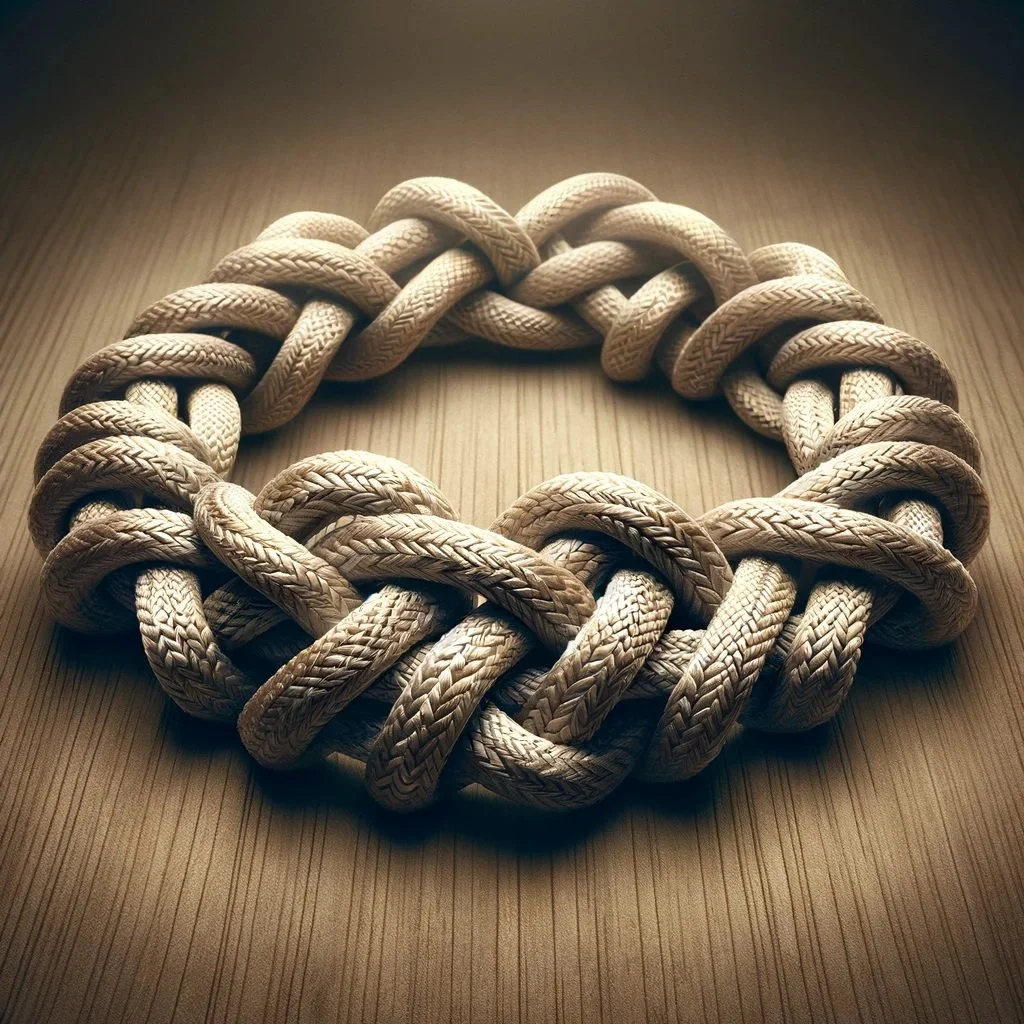
Here's the illustration of a tied chain sinnet knot, also known as a monkey braid, showcasing its practicality for shortening or storing rope in a compact and organized manner.
The Chain Sinnet (also known as a Monkey Braid or Daisy Chain) is a method of shortening a rope or cord while also making it more manageable and less prone to tangling. This technique is not only practical for storing ropes and cords efficiently but can also be used decoratively in crafting projects. Here’s how to tie a Chain Sinnet:
Materials Needed
A length of rope or cord. The length can vary depending on your needs, but a longer rope will give you more practice with the technique.
Step-by-Step Instructions
Step 1: Create a Loop
Begin by making a simple loop near the end of the rope, leaving a short tail. The size of the loop can vary, but typically, a larger loop is easier to work with. Ensure the tail is on the underside of the loop.
Step 2: Form the First Sinnet
Reach through the initial loop, grasp the standing part of the rope (the long part), and pull it through the loop to create a new loop. Essentially, you're making a slip knot.
Step 3: Continue the Chain
Now, reach through the new loop you just created, grab the standing part of the rope again, and pull it through to create another loop. Continue this process, always reaching through the last loop made, grabbing the standing part of the rope, and pulling it through to create the next loop.
Step 4: Maintain Consistent Loop Size
Try to keep the loops roughly the same size as you go. Consistency is key to a neat and orderly chain sinnet. The tension on each loop should be snug but not overly tight, as you might want to undo the chain later.
Step 5: Finishing the Chain
When you reach the end of the rope, or have shortened the rope to your desired length, you can secure the final loop. To do this, either pull the remaining tail of the rope all the way through the last loop (without making a new loop) or use a small object like a twig or a bead to lock the last loop by threading it through.
Step 6: Releasing the Chain
To release the chain sinnet and return the rope to its full length, simply pull on the end of the rope where you finished. If you secured the last loop with an object, remove it first. The chain should quickly unravel.
Tips for Tying a Chain Sinnet
Practice with a smooth, flexible rope to start. Once you’re comfortable, you can apply the technique to other materials.
The chain sinnet is not only for shortening ropes but can also be used for decorative purposes in crafts, such as making handles for bags or as part of jewelry.
Ensure the loops are not too tight, especially if you plan to release the chain frequently.
Applications of a Chain Sinnet
Storage: Shortening and organizing ropes, extension cords, or hoses to prevent tangling.
Decorative: Creating handles, bracelets, or other decorative items.
Functional: Quickly deploying lengths of rope in activities like camping or boating.
The Chain Sinnet is a versatile technique that combines practicality with the potential for decorative use. With a bit of practice, it becomes a quick and easy method to manage rope length and storage efficiently.
Bowline Knot
Rose Knot:

Here's the illustration of a tied rose knot, emphasizing its decorative beauty and intricate design, resembling a blooming rose.
The Rose Knot, often admired for its decorative appearance resembling a rose, is a complex knot frequently used in macramé projects, decorative ropework, and even in nautical settings. While it might seem daunting at first, creating a Rose Knot is about understanding the steps and practicing. This tutorial will guide you through making a basic Rose Knot using cord or rope.
Materials Needed
A length of rope or cord. A softer, more pliable material is easier to work with for beginners.
A flat surface to work on, as you'll need to lay out and adjust the cord during the process.
Step-by-Step Instructions
Step 1: Create a Loop
Begin by laying your cord flat on your working surface. Make a loop near one end of the cord by bringing the tail over the standing part (the longer section of the cord). This loop will serve as the center of your rose.
Step 2: Form the Petals
Take the tail of your cord and start wrapping it around the outside of the loop you just created. These wraps will form the "petals" of the rose. The key is to wrap loosely enough that you can adjust the loops later but tightly enough that the structure holds.
Step 3: Continue Wrapping
Continue wrapping the tail around the initial loop, gradually increasing the size of the loops to mimic the appearance of rose petals. Aim for at least three to five wraps, depending on the length of your cord and the desired size of your rose.
Step 4: Secure the Knot
After you've completed the desired number of wraps, pass the tail of the cord through the back of the initial loop to secure the petals. This step prevents the knot from unraveling.
Step 5: Adjust the Petals
Carefully adjust the loops (petals) by gently pulling on them to create a more defined rose shape. The goal is to have the petals evenly spaced, with the outer petals being slightly larger than those at the center.
Step 6: Final Touches
Once you're satisfied with the shape of your rose, you can further secure the knot by tying off the tail on the backside of the knot, either with a simple overhand knot or by tucking it under existing wraps. Trim any excess cord if necessary.
Tips for Tying a Rose Knot
Practice with a longer piece of cord than you think you'll need. It's easier to trim excess cord than to start over with a new piece.
Soft, flexible cord is easier to adjust and manipulate into the desired shape.
The Rose Knot can be used in various applications, from decorative keychains and jewelry to embellishments on wrapped gifts or nautical-themed projects.
Applications of a Rose Knot
Decorative Crafts: Adding a unique touch to macramé wall hangings, plant hangers, or bracelets.
Gift Wrapping: Creating an ornamental finish on a wrapped package.
Nautical Decoration: Embellishing rope work on boats or in home decor.
Creating a Rose Knot may require some patience and practice, but the result is a beautiful, intricate design that can add a special touch to various projects. Once you master the basic technique, you can experiment with different sizes and combinations to create unique designs.
A better way to tie your gym shorts.
Trinity Knot:

Here's the illustration of a tied trinity knot, highlighting its symbolic significance and complex pattern with three interlocking loops.
The Trinity Knot, also known as the Triquetra, is a decorative knot with a symmetrical, triangular design that has been used in various cultures and periods, often carrying religious or symbolic meanings. In modern times, it's popular in crafting, jewelry making, and as a decorative element in various accessories. Tying a Trinity Knot in cord or rope can be a meditative process, resulting in a beautiful piece of knot art. This tutorial will guide you through the steps to create a Trinity Knot.
Materials Needed
A length of flexible cord or rope. A softer, more pliable material is easier to work with.
A flat surface to work on, as laying out the cord is essential for forming the knot.
Step-by-Step Instructions
Step 1: Prepare the Cord
Begin with a length of cord. The amount of cord you need will vary based on the thickness of the material and the desired size of the knot, but a good rule of thumb is to start with at least 12 inches to make the knot tying process easier to manage.
Step 2: Create the First Loop
Lay the cord flat on your working surface. Take the right end of the cord and fold it over itself to form a loop that points towards the left. This loop will serve as one of the three points of the Trinity Knot.
Step 3: Weave the Second Loop
Take the left end of the cord and pass it over the right end, then under the loop you just formed, creating a second loop that points downwards. This action starts to form the interwoven structure characteristic of the Trinity Knot.
Step 4: Complete the Triquetra Shape
To form the third loop of the Triquetra, you need to pass the left end (now coming from the bottom of the second loop) over the right end and then through the first loop you made. You should now have a loose version of the Trinity Knot with three interlocking loops.
Step 5: Tighten the Knot
Carefully begin to tighten the knot by gently pulling on each end of the cord while maintaining the knot's shape. Adjust the loops as needed to ensure they are even and the knot remains symmetrical.
Work slowly to tighten the knot evenly, pulling out any slack and shaping the loops until the Trinity Knot is firm and well-defined.
Tips for Tying a Trinity Knot
Patience is key. Adjusting the loops to make them symmetrical can take some time, especially when learning.
Use your fingers to shape the loops as you tighten the knot to maintain the triangular, interwoven appearance.
If you're using the knot for a bracelet or necklace, consider using a thinner cord for a more delicate appearance.
Applications of a Trinity Knot
Jewelry Making: The Trinity Knot can be used as a pendant or charm in necklaces and bracelets.
Decorative Arts: Incorporate the Trinity Knot in crafting projects, such as card making, scrapbooking, or as embellishments on clothing and accessories.
Symbolic Gifts: Due to its historical and cultural significance, a Trinity Knot can be a meaningful gift, symbolizing concepts such as love, honor, and protection.
The Trinity Knot is a beautiful example of knot art that combines symmetry, history, and craftsmanship. With practice, you can tie this knot smoothly and use it in various creative and decorative projects, adding a touch of elegance and meaning.
World’s Most Dangerous Knot … or Most Useful?
Eldredge Knot:

Here's the illustration of a tied Eldredge knot, emphasizing its unique and sophisticated design, perfect for formal occasions.
The Eldredge Knot is an intricate and elegant necktie knot that stands out for its complexity and unique layered pattern. Unlike more traditional knots, the Eldredge Knot involves a series of diagonal wraps and tucks that create a striking look, perfect for special occasions or when you want to make a bold fashion statement. Due to its complexity, it may take some practice to master, but the result is well worth the effort. Here's how to tie the Eldredge Knot:
Materials Needed
A necktie. For beginners, using a tie with a contrasting tail side (the underside) can help keep track of the steps.
Step-by-Step Instructions
Step 1: Start with the Right Length
Place the tie around your neck with the seam facing inward and the thick end on your left side. The Eldredge Knot consumes more fabric than simpler knots, so start with the thick end significantly higher than you would for a Windsor or a Four-in-Hand Knot. Depending on your tie length and torso, the thick end might only hang a few inches below your collar.
Step 2: Create the Base
Cross the thin end over the thick end to the right, underneath to the left, and then up through the neck loop from underneath. This creates a small loop on the left side of the knot. Tighten and adjust this loop to lie snugly against the collar. The rest of the knot will be formed using the thin end.
Step 3: Weave the Knot
Take the thin end over the front to the right side and then behind the thick end to the left side. Pull it diagonally upwards and pass it through the neck loop from underneath, exiting on your right side.
Now, take the thin end across the front from right to left and then up through the neck loop from underneath again. Tuck the thin end down through the loop you just created in front of the knot.
Step 4: Form the Body of the Knot
Continue by taking the thin end around the back of the thick end to the right side, up through the neck loop from underneath, and down through the loop you just created on the front of the knot. Adjust the fabric to tighten the knot and to form the distinctive layered pattern.
Step 5: Finish the Knot
To finish, take the thin end around the back and tuck it out of sight behind the neck loop or under the collar. Use a tie clip or pin if necessary to secure the tail to the back of the thick end.
Tips for Tying the Eldredge Knot
Use a mirror to help guide you through the steps until you become more familiar with the process.
Practice with a silk or smooth, lightweight tie, as these materials are easier to manipulate and adjust.
Because of its complexity and size, the Eldredge Knot works best with a semi-spread or wide-spread collar.
Applications of the Eldredge Knot
Formal Events: Ideal for weddings, formal parties, or any event where you want to stand out.
Business Settings: Make a statement in professional settings where creativity and individuality are valued.
The Eldredge Knot is not just a way to tie your tie; it's a fashion statement that says you're not afraid to stand out and be bold. With practice, you can master this knot and add an impressive skill to your sartorial repertoire.
Conclusion
With Knot Mastery Unleashed, you now have the ultimate resource at your fingertips to explore, learn, and master over 50 unique knots. Whether you're a seasoned knot enthusiast or just starting your journey, there's something for everyone in this comprehensive guide. So dive in, explore the intricate world of knots, and unleash your inner knot master today!

Knot Mastery Unleashed: Dive into 50+ Unique Ways to Tie


